Decking Installation Guide for DIYers
Composite decking is the perfect addition to any outside space. Combining the beauty of wood with the practicalities of uPVC, composite is split, splinter, and slip resistant, making it safe and comfortable underfoot, and very easy to maintain. It is also simple to install! If you're installing your new composite decking yourself, there are a few factors you need to consider before starting from correctly measuring the size of your new deck, preparing the ground for installation and building the best subframe, to drainage and correct fitting. Planning and preparing these aspects before you begin will stand you in good stead for a successful and professional decking installation.
Step-by-step method for installing composite decking
Required tools for installation
The following items will make the installation of your decking easier and will result in a professional finish:
- Circular saw
- Smart bit
- Safety glasses
- Cordless drill
- Chalk line
- Hearing protection
- Spirit level
- Spacer
- Dust mask
Measurements and preparing the site
Correctly measuring your proposed deck site will ensure that you not only build the most suitable substructure, but that you buy the correct amount of deck boards and accessories. We always recommend reading the manufacturer's instructions, as they will usually have tips and guidance on how to measure correctly, and always always! measure twice!
Building the substructure
To ensure your deck stays strong and safe for many years to come, you need to start with a solid base. If you're building the substructure yourself, there are a few factors you need to consider before starting. These include:
- Material
- Deck height
- Direction of bearers
- Joist spacing
- Post and pedestal spacing
- Number of bearers
In terms of how to put your substructure together and with what, it is important to read the manufacturer's instructions to ensure you use the correct fixings and fixtures.
The importance of correctly fitted joist centres
Most composite decking manufacturers will have specific guidelines on how far apart your decking joists or pedestals should be. This distance is extremely important as it ensures your deck boards are correctly supported and will not dip or curve over time.
Fitting your deck boards
Whilst you should always follow the manufacturer's instructions, the below is an overview to give you a rough idea of what is involved:
- Firstly, always follow the manufacturer's instructions! Different decks may require different installation techniques, so it's always wise to start with the manufacturer's instructions.
- Your substructure should already be installed, but before you lay your deck boards double check that it has a minimum 80mm ground clearance to ensure good air flow under and through the decked area. Your subframe should also be raised off the ground to allow for drainage.
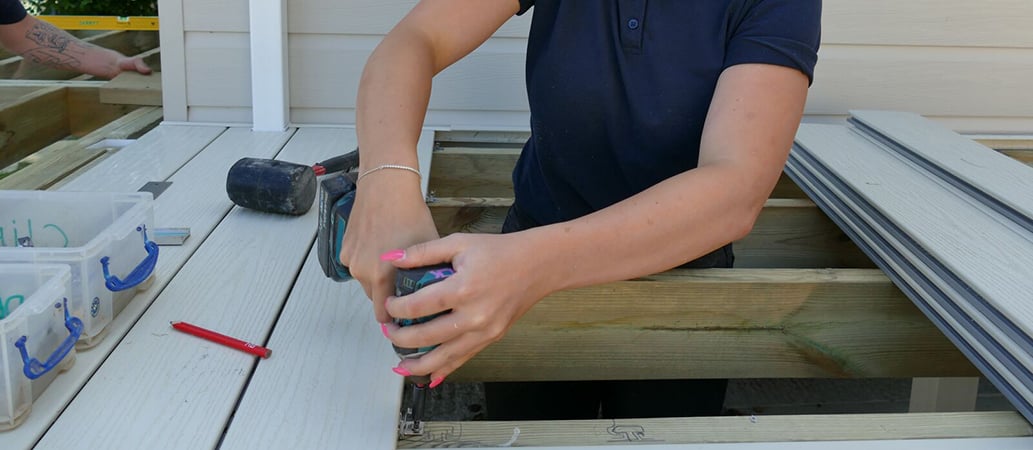
- Next, place the first board on the substructure. Using a minimum 18v cordless drill impact driver, pre-drill all screw positions using a smart bit. Two screws must be used opposite each other on each bearer. Never place or fix screws without pre-drilling.
- When driving the screw home, pressure should be placed on top of the drill until the screw is fully driven in.
- Repeat all steps until the decked area is covered.
- Once installed, clean the surface of the decked area immediately simply brush the area until all debris has been removed.
The importance of board gaps
When laying composite decking, you must allow for at least a 5mm space between the boards. If the area where the decking is being installed is rather damp or there's not much air flow you will need to increase this distance to 10mm. Also ensure a minimum 10mm gap at board ends where they meet a hard surface, such as a wall, fence, sleeper, or lawn.
Air flow is a necessity when laying composite or timber decking to prevent warping, that's why you MUST have the correct distance between the boards. To make spacing the boards simple, we would recommend using an appropriate spacer. These spacers allow you to easily set the correct distance between the boards when laying them. To ensure airflow is sufficient, the decking needs a ground clearance of a minimum of 80mm, which you can achieve by using the correct substructure and pedestals. Once you've worked out your spacings and ensured sufficient air flow around your composite decking boards, you can start fitting them.
Big mistakes to avoid
There are a few pitfalls you need to be aware of and avoid when installing your own decking:
- Not pre-drilling: always pre-drill your screw holes. If you do not, you could run the risk of cracking the deck board.
- Incorrect spacing: correct spacing is needed to ensure your composite boards can contract and expand without bowing or bending. It is also required to allow air to flow throughout the boards and for water to run off them.
- Using the wrong screws: It is imperative to use the correct screws, as advised by the manufacturer. Using the incorrect screws can cause cracks in your boards.
If you're embarking on your first deck installation project and have any queries or would like further guidance, call our friendly expert team today on 0800 22 77 77.